Products and configurations to compare
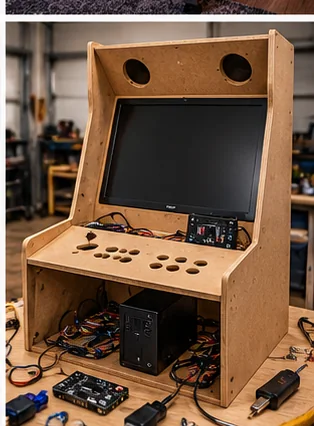
Two-player flat-pack arcade cabinet
A flat-pack can save dozens of fabrication hours while preserving a custom electronics/control build.
Best when: you want predictable geometry without woodworking the entire shell
Watch for: shipping cost and panel material/edge finish vary by seller
Two-player joystick/button kit
Buying controls separately lets you choose the exact lever/button feel and keep spares standardized.
Best when: you want known-quality controls rather than generic kit parts
Watch for: premium Japanese parts cost more and panel mounting needs accurate holes
N100 mini PC + 24-inch monitor
This pairing is enough for a very broad retro library while keeping heat and power modest.
Best when: you want a quiet low-power classic multicade
Watch for: modern 3D games may require a stronger GPU
Cabinet shell
Use 3/4-inch MDF, plywood or a quality flat-pack. Design a rear service door, hinged/removable control panel and VESA/replaceable monitor mount.
Controls
Choose the games first. A two-player six-button panel is broad, but four-way classics, trackballs, spinners and light guns each need special treatment. Do not add every control until the panel becomes unusable.
Encoder
Use a documented USB encoder whose input mode matches the software. Label each wire at the button and board.
Monitor
A 24-inch 1080p IPS display is a flexible general choice. Mount it so it can be removed independently of the bezel.
Computer
A low-power mini PC keeps heat and service complexity down. Install it on a shelf with visible ports and enough ventilation.
Audio
A small Class-D stereo amplifier plus two cabinet speakers is plenty. Mount a physical volume knob somewhere accessible.
Power and service
Use a listed surge protector/power strip inside the cabinet, route low-voltage wiring cleanly, and avoid DIY mains splices. One external master switch can power the cabinet if the connected devices support safe auto-start.
Finishing
T-molding, vinyl, paint and marquee lighting should happen after the machine survives a week of test play. Do not bury a wiring problem under finished artwork.
A DIY cabinet should be designed around service access
It is easy to draw a cabinet that looks like an arcade silhouette. It is harder to build one where the monitor can be removed, the PC can be reached, buttons can be replaced and speakers can be serviced without dismantling the whole machine. Before cutting wood, draw the back door, control-panel hinge or removable panel and cable route.
Airflow belongs in the design from the beginning. Mini PCs, power supplies and amplifiers are efficient but still make heat. Intake low, exhaust high, keep dust screens accessible and avoid sealing electronics into a decorative box with no ventilation.
Software and game licensing are separate from hardware
HomeArcadeGuide should be able to tell you what hardware is useful without encouraging unlicensed game acquisition. Use software and ROMs you are legally entitled to run. That keeps the build focused on controls, display, latency and cabinet quality instead of turning a hardware guide into a piracy tutorial.
Before checkout
- Measure final cabinet footprint and player standing space
- Measure the entire delivery route before ordering
- Confirm game list, control layout and number of players
- Check screen size and viewing angle from normal stance/seating
- Confirm Wi-Fi/Ethernet needs and whether online features are optional
- Price stools, risers, mats and surge protection with the machine
- Check warranty, freight damage and return terms
- Confirm replacement controls or parts are realistically obtainable
- Plan ventilation and service access
- Use only game/software content you have the rights to run
Installed cost: the part listings do not show
Budget freight or local pickup, stools or seating, floor protection, surge protection, network access, extension of an existing wired network where appropriate, and an initial parts reserve. If a machine requires permanent electrical work, treat that as room infrastructure rather than hiding it inside the cabinet price. A collection that arrives under budget but has no comfortable place to stand or sit is not actually under budget.
Measure the route with packaging in mind when a machine ships assembled or partly assembled. Door width is only one constraint; stair turns, ceiling height, railings, elevators and the ability to rotate a long cabinet matter. HomeArcadeGuide's doorway and shipping planners exist to catch those mistakes before freight arrives.
How to evaluate the purchase in the first week
Play the games and controls you bought it for, not only the easiest title on the menu. Test every direction/button, both players, audio at quiet and loud levels, network reconnect after power-off, display uniformity and cabinet wobble. If it is a virtual or software-driven platform, update only after confirming the current machine works and documenting its starting state.
Keep the carton and packing material until the return window and freight-damage inspection are safely behind you. Large arcade products are unusually expensive to return, and original packaging can matter if a display or control panel needs to travel for service.
Frequently asked questions
How much does a DIY arcade cost?
A solid two-player build commonly spans several hundred to well over $1,000 depending on cabinet, controls and computer.
Can I use Raspberry Pi instead of a mini PC?
Yes for many retro libraries, but a mini PC provides broader x86/Windows software options.
Do I need six buttons per player?
Only if your game library uses them. Four-button or three-button layouts can be cleaner for classic cabinets.
Where do I get games?
Use games/software you legally own or are licensed to run.
Primary/current sources
- Sanwa Denshi — current joystick/button product catalog
- HomeArcadeGuide — current homepage and planning philosophy
Affiliate disclosure: HomeArcadeGuide.com may earn from qualifying purchases through Amazon Associates and eBay Partner Network at no extra cost to you. Manufacturer links in the source section are research references, not tracked endorsements.